Setup AWS Elastic Load Balancer


Table of contents
- How to setup AWS Elastic Load Balancer and force to use HTTPS?
- Requirements:
- Select a Load Balancer Type:
- To define your load balancer
- Assign Security Groups to Your Load Balancer in a VPC
- Configure Security Settings
- Configure Health Checks
- Register EC2 Instances with Your Load Balancer
- Tag Your Load Balancer (Optional)
- Create and Verify Your Load Balancer
- How to Force HTTPS Behind AWS ELB
How to setup AWS Elastic Load Balancer and force to use HTTPS?
This article provides an introduction to using a Load Balancer (Classic and Application) through the AWS Management Console, a web-based interface.
Here, you’ll create a load balancer that receives public HTTP/HTTPS traffic and sends it to your EC2 instances.
Requirements:
AWS Account & access to AWS web console
Setup of Multiple Subnets (Public & Private) to setup secure ELB Setup
AWS VPC Setup
Security Groups with appropriate rules
NACLs will adequate rules
Multiple running EC2 instances with running web-server (Apache/Nginx/IIS)
HTTPS SSL certificate to configure Secure connection (Optional)
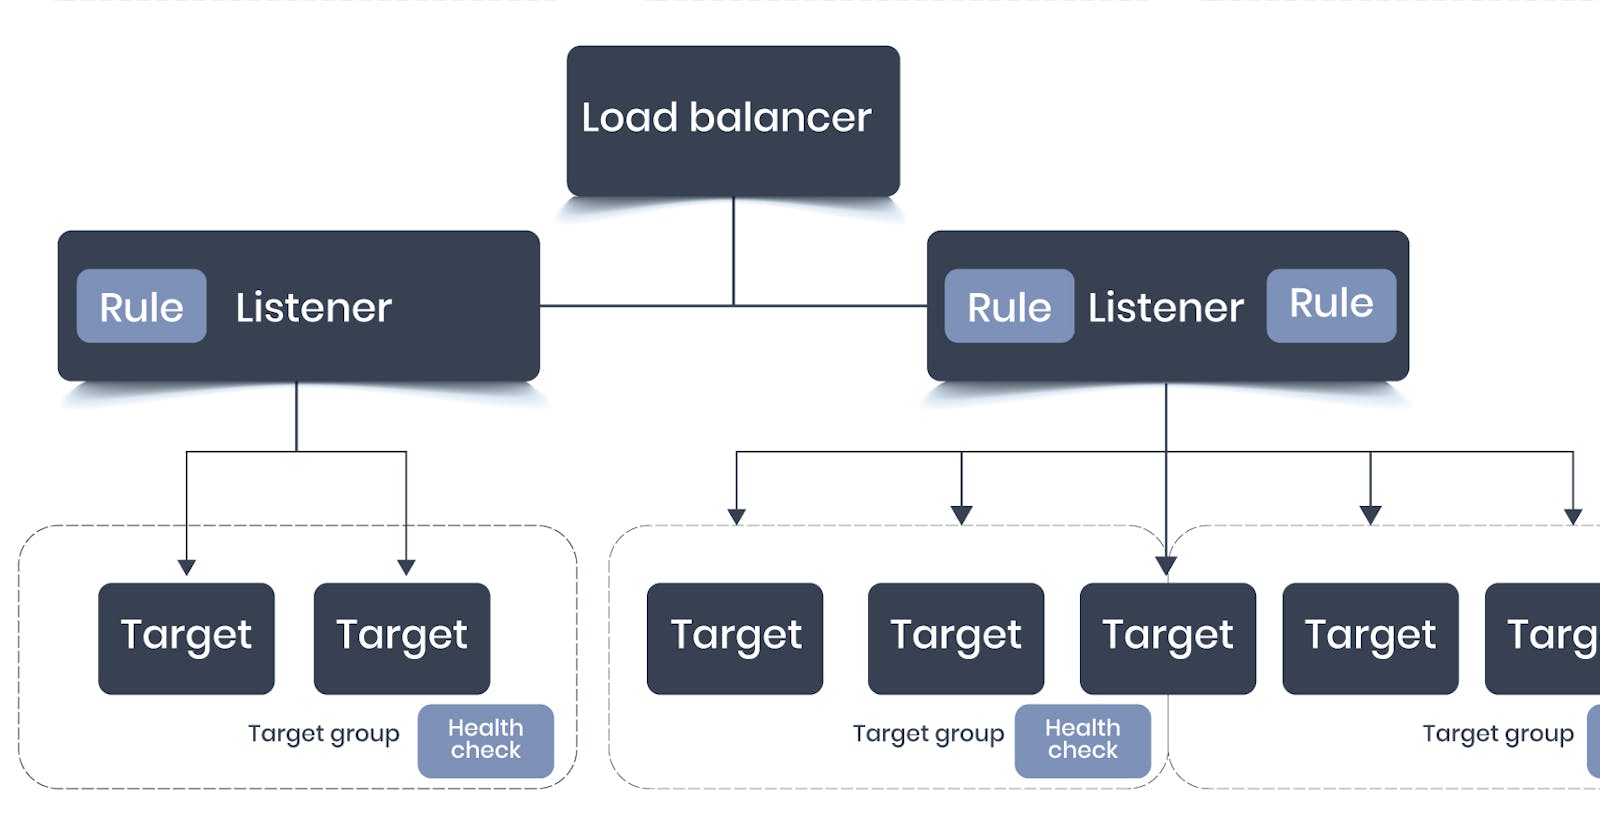
Select a Load Balancer Type:
Elastic Load Balancing supports two types of load balancers: Application Load Balancers and Classic Load Balancers.
To Create a Classic Load Balancer:
On the navigation bar, choose a region for your load balancer. Be sure to select the same region that you selected for your EC2 instances.
On the navigation pane, under LOAD BALANCING, choose Load Balancers.
Choose Create Load Balancer.
Choose Classic Load Balancer, and then choose Continue
To define your load balancer
On the navigation pane, under LOAD BALANCING, choose Load Balancers.
Choose Create Load Balancer.
For Select load balancer type, choose Classic Load Balancer.
For Load Balancer name, type a name for your load balancer.
The name of your Classic Load Balancer must be unique within your set of Classic Load Balancers for the region, can have a maximum of 32 characters, can contain only alphanumeric characters and hyphens, and must not begin or end with a hyphen.For Create LB inside, select the same network that you selected for your instances: EC2-Classic or a specific VPC.
[Default VPC or your custom created VPC] If you selected a default VPC and would like to choose the subnets for your load balancer, select Enable advanced VPC configuration.
For Listener Configuration, leave the default listener, and choose Add to add another listener. For Load Balancer Protocol for the new listener, select HTTPS (Secure HTTP). This updates Load Balancer Port, Instance Protocol, and Instance Port.
By default, Instance Protocol is HTTP and Instance Port is 80.
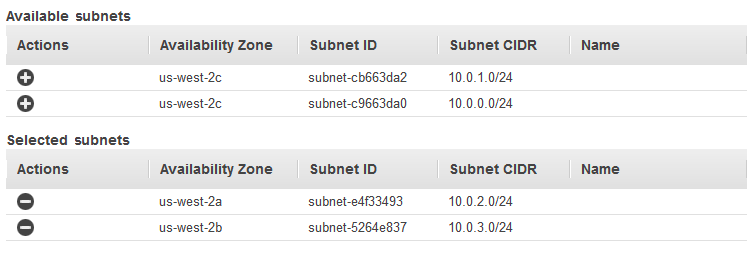
If you want to set up back-end instance authentication, change the instance protocol to HTTPS (Security HTTP). This also updates Instance Port.[EC2-VPC] For Available subnets, select at least one available subnet using its add icon. The subnets are moved under Selected subnets. To improve the availability of your load balancer, select subnets from more than one Availability Zone.
Note
If you selected EC2-Classic as your network, or you have a default VPC but did not select Enable advanced VPC configuration, you do not see the user interface to select subnets.
You can add at most one subnet per Availability Zone. If you select a second subnet from an Availability Zone where there is already a selected subnet, this subnet replaces the currently selected subnet for that Availability Zone.
Choose Next: Assign Security Groups.
Assign Security Groups to Your Load Balancer in a VPC
If you selected a VPC as your network, you must assign your load balancer a security group that allows inbound traffic to the ports that you specified for your load balancer and the health checks for your load balancer.
Note
If you selected EC2-Classic as your network, you can continue to the next step. By default, Elastic Load Balancing provides a security group for load balancers in EC2-Classic.
To assign security group to your load balancer
On the Assign Security Groups page, select Create a new security group.
Type a name and description for your security group, or leave the default name and description. This new security group contains a rule that allows traffic to the ports that you configured your load balancer to use.
Choose Next: Configure Security Settings.
Configure Security Settings
When you use HTTPS or SSL for your front-end listener, you must deploy an SSL certificate on your load balancer. The load balancer uses the certificate to terminate the connection and then decrypt requests from clients before sending them to the instances.
You must also specify a security policy. Elastic Load Balancing provides security policies that have predefined SSL negotiation configurations, or you can create your own custom security policy.
If you configured HTTPS/SSL on the back-end connection, you can enable authentication of your instances.
To configure security settings
For Select Certificate, do one of the following:
If you created or imported a certificate using AWS Certificate Manager, selectChoose an existing certificate from AWS Certificate Manager (ACM), and then select the certificate from Certificate.
If you imported a certificate using IAM, select Choose an existing certificate from AWS Identity and Access Management (IAM), and then select your certificate from Certificate.
If you have a certificate to import but ACM is not available in your region, select Upload a new SSL Certificate to AWS Identity and Access Management (IAM). Type the name of the certificate. In Private Key, copy and paste the contents of the private key file (PEM-encoded). In Public Key Certificate, copy and paste the contents of the public key certificate file (PEM-encoded). In Certificate Chain, copy and paste the contents of the certificate chain file (PEM-encoded), unless you are using a self-signed certificate and it’s not important that browsers implicitly accept the certificate.
For Select a Cipher, verify that Predefined Security Policy is selected and set to ELBSecurityPolicy-XXXX-XX. We recommend that you always use the latest predefined security policy.
(Optional) If you configured the HTTPS listener to communicate with instances using an encrypted connection, you can optionally set up authentication of the instances.
For Backend Certificate, select Enable backend authentication.
Note
If you do not see the Backend Certificate section, go back to Listener Configuration and select HTTPS (Security HTTP) for Instance Protocol.For Certificate name, type the name of the public key certificate.
For Certificate Body (pem encoded), copy and paste the contents of the certificate. The load balancer communicates with an instance only if its public key matches this key.
To add another certificate, choose Add another backend certificate.
Choose Next: Configure Health Check.
Configure Health Checks
Elastic Load Balancing automatically checks the health of the registered EC2 instances for your load balancer. If Elastic Load Balancing finds an unhealthy instance, it stops sending traffic to the instance and reroutes traffic to the healthy instances. For more information about configuring health checks.
To configure health checks for your instances
On the Configure Health Check page, select a ping protocol and ping port. Your EC2 instances must accept the specified traffic on the specified ping port.
For Ping Path, replace the default value with a single forward slash (“/”). This tells Elastic Load Balancing to send health check requests to the default home page for your web server, such as index.html.
Keep the other settings at their default values.
Choose Next: Add EC2 Instances.
Register EC2 Instances with Your Load Balancer
Your load balancer distributes traffic between the instances that are registered to it. You can select EC2 instances in a single Availability Zone or multiple Availability Zones within the same region as the load balancer.
To register EC2 instances with your load balancer
On the Add EC2 Instances page, select the instances to register with your load balancer.
Leave cross-zone load balancing and connection draining enabled.
Choose Next: Add Tags.

Tag Your Load Balancer (Optional)
You can tag your load balancer, or continue to the next step.
To add tags to your load balancer
On the Add Tags page, specify a key and a value for the tag.
To add another tag, choose Create Tag and specify a key and a value for the tag.
After you are finished adding tags, choose Review and Create.
Create and Verify Your Load Balancer
Before you create the load balancer, review the settings that you selected. After creating the load balancer, you can verify that it’s sending traffic to your EC2 instances.
To create and test your load balancer
On the Review page, check your settings. If you need to make changes, choose the corresponding link to edit the settings.
Choose Create.
After you are notified that your load balancer was created, choose Close.
Select your new load balancer.
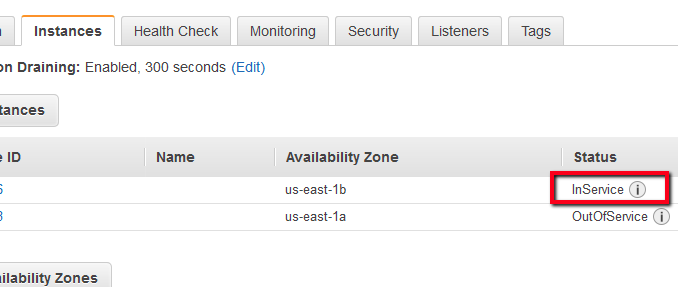
On the Description tab, check the Status row. If it indicates that some of your instances are not in service, its probably because they are still in the registration process.
How to Force HTTPS Behind AWS ELB
In the most common configurations, when running your web app behind Nginx or Apache, your https:// request will get redirected to http://. Sometimes, you may want to rewrite all HTTP requests to HTTPS.
The Amazon Elastic Load Balancer (ELB) supports a HTTP header called X-FORWARDED-PROTO. All the HTTPS requests going through the ELB will have the value of X-FORWARDED-PROTOequal to “HTTPS“. For the HTTP requests, you can force HTTPS by adding a simple rewrite rule, as follows:
Nginx:
In your nginx site config file, rewrite it:
server {
listen 80;
….
location / {
if ($http_x_forwarded_proto != ‘https’) {
rewrite ^ https://$host$request_uri? permanent;
}
….
}
}
Apache:
You can rewrite these configuration to your sites’s config file:
Thankyou!!
Irfan